

Codegen flow
Take your idea →Convert design to DSL
→ Import to LLM → Generate UI
Our code generation flow is a structured pipeline that transforms Figma designs into fully typed, validated, and production-ready code. It is built as a sequence of layers, each progressively reducing ambiguity and increasing determinism.
01
Figma Designs
The process starts with properly prepared design files.
To enable reliable code generation, designs must follow strict rules:
- components are used instead of arbitrary frames
- all properties are defined via Styles and Variables
- components include descriptions, annotations, and metadata nodes
This step establishes the foundation for machine-readable design.
Design Lint validation
Before entering the pipeline, designs are validated:
- compliance with the token system
- structural correctness of components
- readability and predictability for models
This step ensures that only clean, consistent inputs proceed further. Figma lint it’s a our own plugin developed specially for Muse needs
02
Design to DSL
The output of Figma Lint Plugin is a Design Component Specification (DCS) — an intermediate DSL-based model that includes:
- variants
- component anatomy
- state machine
- layout constraints
- behavioral models
This is the key transition from design to a formal system model.
03
Design to DSL
The output of Figma Lint Plugin is a Design Component Specification (DCS) — an intermediate DSL-based model that includes:
- variants
- component anatomy
- state machine
- layout constraints
- behavioral models
This is the key transition from design to a formal system model.
04
DSL to LLM
The Design System Language (DSL) is a structured, machine-readable representation of components.
Key characteristics:
- formal enough for deterministic code generation
- validated via framework configuration
- decouples design intent from implementation
05
Code generation
In the final stage, the DSL is compiled into code.
The generated output is:
- strictly typed
- token-driven
- validated against component anatomy
Supported generation modes:
- Full generation (greenfield components)
- Patch generation (LLM diff → PR)
- Constraint-based generation (e.g. styles only)
8. Output
06
The core principle of this flow is progressive reduction of ambiguity:
Design → Tokens → Metadata → DCS → DSL → Code
Each layer:
- adds structure
- reduces uncertainty
- increases predictability
As a result, code generation becomes a deterministic, system-driven process rather than “magic.”
Something off with the sync?

Please tell us about the problems you've experienced playing with audio or video sync. Your feedback helps us improve tabs for everyone.
Describe the issue
Send report

Securing the Repository Against Supply Chain Attacks
In simple terms, a supply chain attack is when malicious code is introduced not directly into our codebase, but through one of the external dependencies we rely on.
We mitigate these risks through multiple layers of protection:
1. 3-Day Quarantine. Newly published packages cannot be installed immediately.
Only packages that have been available for at least 3 days are allowed.
This gives the community time to detect and report malicious activity.
2. Restricted Sources
Dependencies can only be installed from trusted registries. No arbitrary GitHub links, no external archives, no unverified sources
3. Protection Against Hidden Scripts
If a package did not previously execute scripts during installation, it cannot suddenly start doing so. This blocks a common attack vector where malicious code is injected via install-time scripts.
4. Private Registry
All internal packages are distributed through our private registry (Nexus) rather than public npm.
This ensures:
- full control over internal dependencies
- no risk of external package substitution
5. Strict Version Pinning
All versions are strictly locked:
- dependencies
- package manager
- CI tooling
Nothing can be updated or replaced without explicit review via pull requests.
6. Automated Auditing
Every pull request triggers automated dependency checks in CI:
- known vulnerabilities
- security advisories
- risk detection
Even if a widely used package is compromised, our multi-layered protection significantly reduces the risk of malicious code entering our product.
Security is not a single mechanism — it’s a system of constraints.
Layering System in Figma
The layering system defines how components are structured and named in Figma so they can be reliably interpreted by AI and transformed into code.
The core idea:
layers are not visual primitives — they are semantic building blocks.
There are no arbitrary frames. Every layer has a defined role and belongs to a fixed type.
Core Principle
Each layer in Figma exists to express meaning, not just layout.
- no “generic frames”
- no ambiguous grouping
- every layer has a specific responsibility
- structure must be deterministic and machine-readable
This ensures that designs can be consistently parsed and transformed into a formal model.
Layer Types
The system is built around a fixed set of layer kinds, each with strict rules and responsibilities.
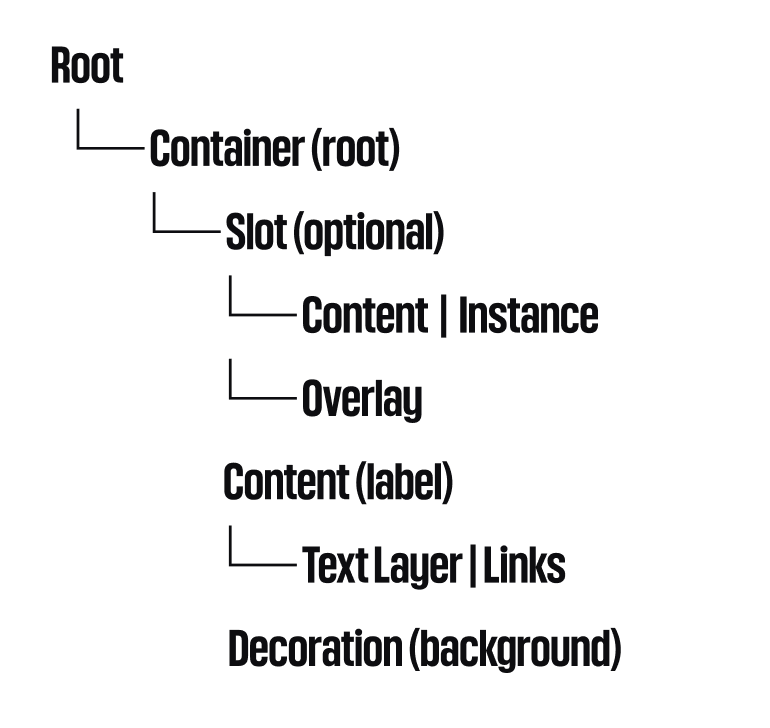
1. Root
The entry point of a component.
- defines the component boundary
- acts as the generation root
- cannot be nested inside another root
- must have a clear component identity
Purpose: establish a stable anchor for the entire component.

2. Container (VStack / HStack)
A structural layout layer.
- organizes child elements
- controls alignment and spacing
- defines layout direction (vertical or horizontal)
- implemented via auto layout
Rules:
- only auto layout is allowed
- no direct styling via raw values (tokens only)
- represents layout, not meaning
Purpose: handle composition and spatial structure.
3. Container (VStack / HStack)
A structural layout layer.
- organizes child elements
- controls alignment and spacing
- defines layout direction (vertical or horizontal)
- implemented via auto layout
Rules:
- only auto layout is allowed
- no direct styling via raw values (tokens only)
- represents layout, not meaning
Purpose: handle composition and spatial structure.

4. Slot
A dynamic insertion point.
- used for replaceable content (icons, actions, etc.)
- defines component extensibility
- can be optional or required
Rules:
- accepts only predefined content types
- must be explicitly named (e.g. leftIcon, rightSlot)
Purpose: define flexible, API-like extension points.
5. Content
The primary semantic content.
- text, labels, titles, input values
- represents the meaning of the component
Rules:
- only semantic content (no decorative elements)
- uses text styles and tokens
- directly maps to component props
Purpose: carry user-facing meaning.
6. Decoration
Purely visual elements.
- backgrounds, icons, illustrations
- non-essential visuals
Rules:
- must not affect component API
- removable without breaking functionality
- no semantic meaning
Purpose: separate visuals from logic.
6. State Layer
Represents component states.
- hover, focus, disabled, active
- implemented as variants
Rules:
- must not change layout structure
- only modifies visual tokens or visibility
Purpose: encode interaction states explicitly.

7. Overlay
Top-level floating elements.
- tooltips, dropdowns, popovers
- elements that exist outside normal layout flow
Rules:
- absolute positioning
- must not affect base layout
- context-dependent rendering
Purpose: handle layered UI and portal-like behavior.
To transform design into code, we use our own Muse Figma Plugin. The plugin converts visual design into a structured, declarative data model.
The plugin is available via the Figma Community, but access is restricted — it can only be used within the Muse Figma Organization and requires a work account.
Figma Lint Plugin
We build unified experience based on a company needs. It’s flexible, adaptive and functional.
To start use it follow the ling. Here we have products Storybook's with documentation & stories chapters about components. Also it contain design gudelines and foundation visual principles.
Try it out!
Role in the Pipeline
The plugin acts as the bridge between Figma and the code generation system. It prepares and normalizes design data before it enters the AI and DSL layers.
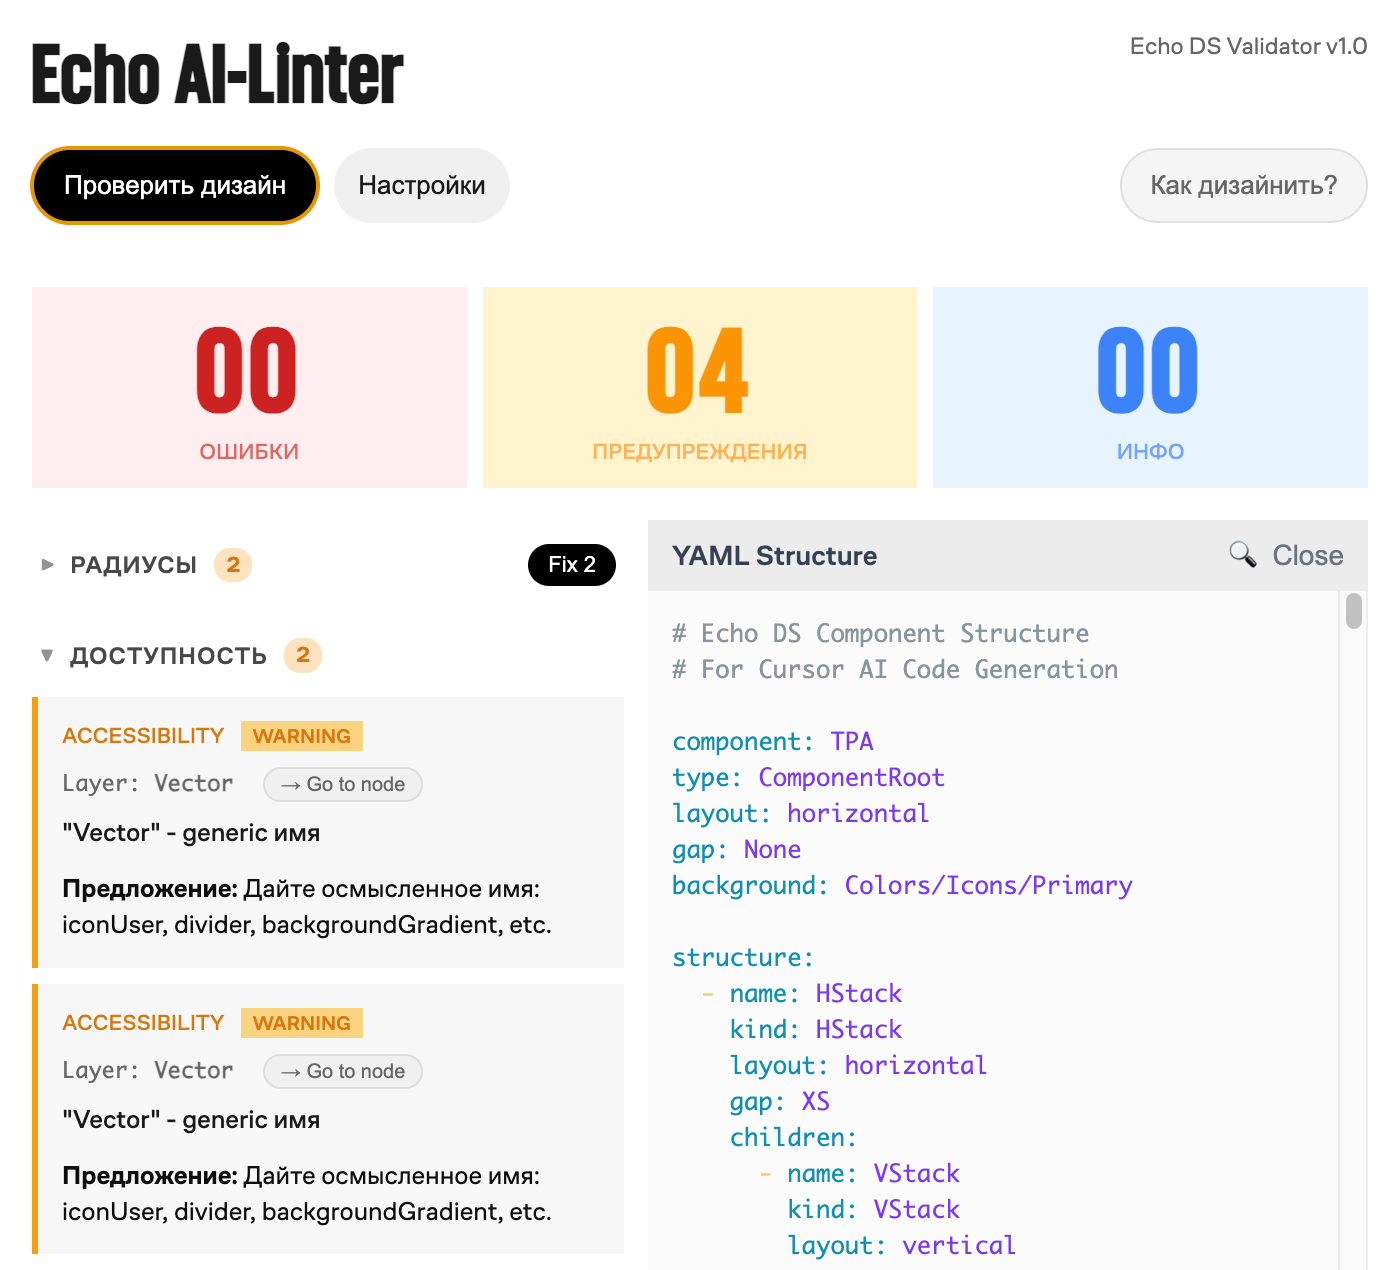
Validation
Before extraction, the plugin validates the design:
- correct layer structure (based on the layering system)
- proper token usage (no raw values)
- valid nesting and hierarchy
- component consistency
This ensures that the design is machine-readable and aligned with system constraints.
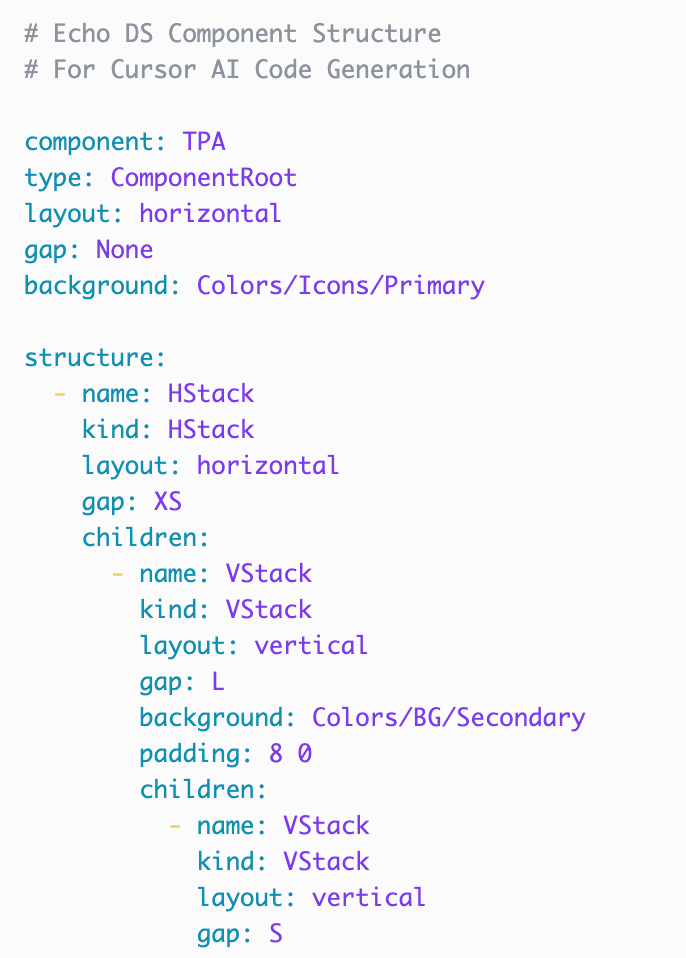
Transformation Output
The result of the transformation is a YAML file that fully describes the interface.
It includes:
- component structure and hierarchy
- metadata and semantics
- spacing and sizing (based on tokens)
- content (text, labels, etc.)
- icons and visual elements
- component properties (props)
- states and variants
Why YAML
YAML serves as a portable, structured representation of the design:
- easy to parse and validate
- human-readable
- compatible with downstream processing (DSL → LLM → code)

In case of questions
These channels will help you find answers to any questions related to DS or its surrounding topics. Please share your ideas and problems here:
Channels:
#ug-design-system
#ug-design-system
#mu-design-system
#au-design-system